The inspiration behind the work created in this process and production lesson was from a piece called 'Lantern Fishes' by Adam Gault .
It will conclude with a class collaborative piece in which will follow a similar style of under the sea animations moving across the screen from right to left.
Each person was to work on their own animation and then they would be joined after being rendered out separately. For that reason it was important to consider accommodations which would have to be made in order for seamless joins between clips.
These will be pointed out throughout.
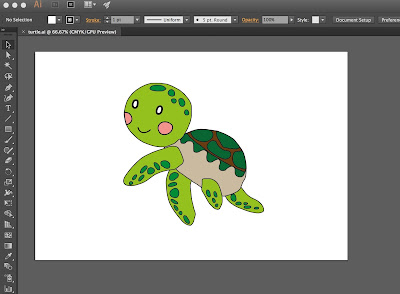
The piece was created on aftereffects and the process was started with an illustrator file of an 'under the sea' character.
This was made using the pen toll and adjusting the paths to form basic outlines of each feature of the figure. These were adjusted from the anchor points and the edges were smoothed by adding rounded corners on effect, stylise. A black stroke was added as an outline and these were filled with the desired colours. The aim was to create a cute, child like illustration which was very simplistic and like a cartoon.
For this to be editable in after effects, each component had to be saved on a new layer. Then this was imported in after effects software using the command+I keyboard controls. The file was selected and then the settings were changed so that the imposition retained its layer sizes.
Once imported a new composition was made with 1920x1080 HD settings and a frame rat elf 25 with a duration of 10 seconds. Each persons clip would need to also be with these settings and each will have ten seconds to edit. To retain continuity as well, we will each have an pre se added key colour as a background- but transparency was used for the editing process by selecting the checkerboard icon to turn off the background.
In my project I worked simultaneously on two compositions. One was of the turtle and the movements it wold make as part of the character. And the other was of the right to left progression, and how the figure would move from A to B. In this 'main composition' the path across the screen could either be done my creating a path and then asking the figure to move along this path, by using the auto orient selection, or was to adjust the position and the rotation gradually my manually changing this in the timeline at the bottom of the controls.

The individual movement of the turtle will be a swimming motion- in which the front fins will make the most recognisable movements in comparison to the back fins- as seen in footage of real like turtles moving in the ocean. To make this more life like the head and body will also slightly bob up and down and rotate as it would in reality.
These were all adjusted individually using the anchor point, position and rotation transform tools, on each layer separately to create the overall effect.

We also practiced new skills like 'motion sketch'. In which an objects path of movement is recorded while you predetermine it. The software records and captures the movements you make on the object and then replicated it. To demonstrate this I used the basic outline of seaweed. In this i learnt about the capturing options. that the 100% speed was real time, and if this number was lowered, the speed increased.


However I chose to take this out of the final render, as I don't think it went with the colours or style already seen in the turtle.
Another form of motion explained, was how an object may appear to 'bounce' as it enters a scene. This was done by importing an object and then at the first keyframe, reduce the height scale to 0. Then a few frames later this is increased beyond the 'normal' as to be elongated, before returning to the right size immediately after.
The video below is the rendered version of the simple turtle animation.
And the vimeo link it is uploaded to